Water is patient. It seeps, wicks, and pushes until a small nuisance becomes a soggy, expensive problem. The good news: a few practical habits can keep your concrete foundation dry and happy.
Start with surface water: send it away
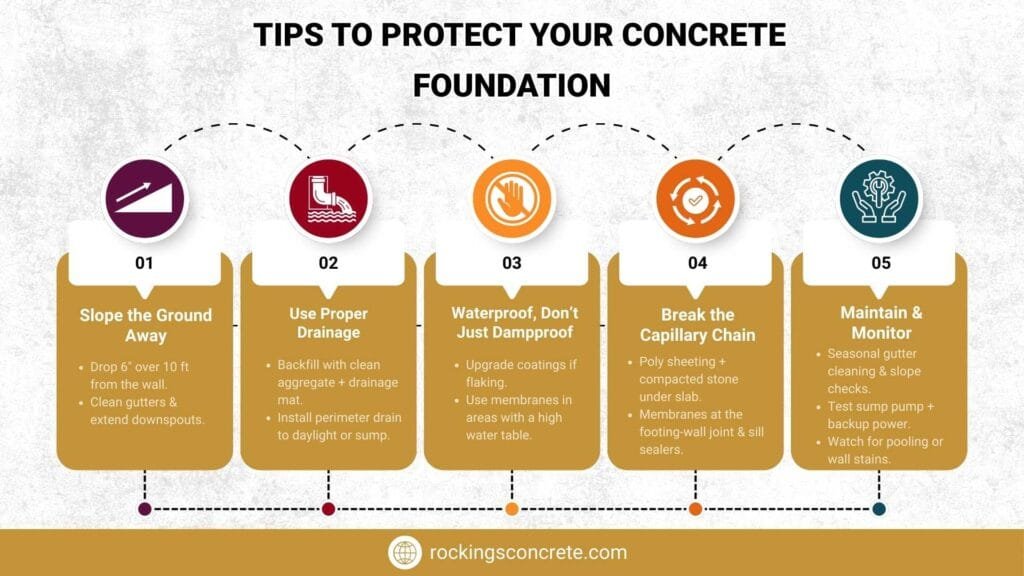
Step one is simple physics—don’t let water linger near the house. Current residential codes require the ground to slope away from the foundation. As a rule, the grade should drop at least 6 inches within the first 10 feet. If your yard traps water against the wall, you’re basically inviting leaks. Regrade low spots and keep topsoil tight to the wall without burying siding.
Gutters and downspouts aren’t optional décor. Keep gutters clean and make sure downspouts discharge far enough that flow does not curl back toward the wall. Extensions and splash blocks help; underground leaders are even cleaner if you can daylight them. The goal is always the same—get roof water off-site, not into the backfill around your foundation for concrete walls.
Control bulk water at the wall
If you’re building or renovating, manage water before it reaches the interior. A proven stack-up is: free-draining backfill, a drainage mat or board, and an exterior perimeter drain (the “footing drain”) that wraps in filter fabric and drops to daylight or a sump.
Under the slab, use a crushed-stone layer that connects to that drain; it acts as a reservoir during storms and gives water a low-resistance path out. Done right, this combo relieves hydrostatic pressure and keeps the wall dry.
Waterproofing vs. dampproofing (and why it matters)
Dampproofing does not allow much wicking of moisture; absorption of high-pressure liquid water. It is generally required that below-grade walls that retain soil at least be dampproofed and, in wetter soils or when located in a high water table environment, be made watertight.
If you see tar-like coating flaking after backfill, that’s a red flag—plan to recoat with a compatible product or consider a membrane system before finishing the basement.
Break the capillary chain
Concrete is porous. It acts like a stone sponge and can wick groundwater upward. That’s why capillary breaks are a big deal.
Under slabs, use compacted clean aggregate topped with polyethylene sheeting; at the footing-to-wall joint, use a fluid-applied or adhered membrane; at the top of the wall, add sill sealer. These tiny “speed bumps” for moisture make a huge difference in long-term dryness.
Sump pumps: have a Plan B
If you rely on an interior drain and sump basin, test the pump seasonally. Clear the intake, confirm the float switch moves freely, and verify the check valve closes.
Then assume the power will go out during the worst storm and add battery or generator backup. FEMA’s guidance is blunt: backup power is necessary because outages and flooding like to travel together.
Windows, wells, and grade breaks
Basement windows and stairwells are classic leak points. Use well covers that shed rain, keep gravel in the bottom of the well for drainage, and maintain positive slope away from these recesses.
If site constraints make grading tough, shallow berms or low barriers can steer water around the house—think subtle landscaping, not castle fortifications. FEMA suggests about 1 inch per foot of slope for at least 10 feet when building berms.
Don’t forget the small stuff
- Seal penetrations. Pipes, conduit, and form tie holes need durable sealants or plugs rated for below-grade use.
- Mind sprinklers. Aim heads away from the wall. Your foundation is not a houseplant.
- Watch hardscapes. Patios and walks should not tilt toward the wall. If they do, you may need grinding, a new overlay, or a drain cut.
Seasonal maintenance checklist
Check these maintenance tips:
- Spring: Clean gutters, reattach loose downspouts, and touch up spots where soil settled after winter.
- Summer: Run a hose test (controlled, short, and gentle) to confirm water tracks away from the house.
- Fall: Clear leaves from area drains and stairwells; test the sump pump and backup.
- Any time after a big storm: Walk the perimeter. Look for ponding, eroded mulch lines, or muddy streaks on the wall.
Soil and landscaping choices matter
Heavy clay holds water; sand drains fast. You can’t change native soils, but you can improve backfill with clean aggregate and a drainage mat to keep fines off the wall. Plantings should not trap mulch against siding or create dams.
Keep thirsty shrubs a little off the wall so irrigation and root zones don’t keep the concrete foundation damp.
“Concrete foundation testing methods” homeowners actually use
You don’t need a lab to catch many moisture issues, but it helps to know what pros use and what they mean:
- In-situ RH testing (ASTM F2170). This is the go-to for measuring internal moisture in concrete slabs. It uses small drilled holes and RH probes to check how wet the slab is inside, not just on the surface. It’s standard practice before flooring or coatings.
- Plastic sheet test (ASTM D4263). A quick screen: tape a plastic sheet to the slab, wait, and check for condensation or darkening. It’s simple, but it only shows surface moisture and has limits. Think of it as a yes/no flag, not a diagnostic.
- Moisture meters and thermal imaging. Pinless meters can spot elevated moisture behind finishes; IR cameras help trace cold, damp areas that suggest leaks or wicking. These tools are great for locating trouble without opening walls.
Retrofits that punch above their weight
- Downspout extensions. Cheap, fast, and wildly effective when yard grading is decent. Aim for a firm discharge point that doesn’t erode.
- Interior drain and sump retrofit. A last line of defense for chronic seepage when exterior excavation isn’t feasible. Pair it with backup power.
- Capillary break “patches.” If you’re replacing a slab, add the full under-slab package (stone + polyethylene). If you’re just reframing, at least install a sill gasket and check for a damp-proofed footing-to-wall joint.
- Landscape rework. Swales and subtle berms can redirect sheet flow around the house without looking like a drainage ditch.
When to call a specialist
Call in a structural or waterproofing expert when you notice: a pool that repeatedly forms next to a wall, cracks that open and seal after a storm and right up, efflorescence lines which recede and re-emerge, or a constantly moving sump in dry weather.
The pressure might lead to damages to the walls; it will be more economical to identify the damage early and correct it than to stitch a bowed wall later.
Quick myths to ignore
- “Waterproof paint fixes everything.” It’s a Band-Aid for damp—not a cure for liquid water under pressure.
- “More caulk, more better.” Caulk won’t overcome bad grading or a missing drain.
- “Concrete doesn’t wick.” It does. That’s why capillary breaks exist.
The bottom line
Keep water away from the wall, give any water that arrives a low-resistance exit, and stop wicking with capillary breaks. Back that up with simple inspections and a sump system that still works when the lights go out.
Do those things, and your foundation for concrete walls will repay you with a dry, usable basement and fewer repair bills. Rocking S Concrete is here to help you protect your investment every step of the way. Your future self—and your drywall—will thank you.